Select your SPOTTY type first


Quick Links for SPOTTY CAMERA
Quick Links for SPOTTY MIRROR


Quick Links for SPOTTY CAMERA
Quick Links for SPOTTY MIRROR
 Check your compatible device
Compatible Device
SPOTTY CAMERA is designed for both tablets and mobile devices.
RAM Capacity: 3GB or above
Tablet Size: Max 12 inches
iOS
iOS 13 or aboveiPhones
iOS 13.0 or aboveiPad
iOS 13.0 aboveiPad Gen 6,7,8,9,10
iPad Mini Gen 5,6
iPad Air Gen 3,4,5
iPad Pro Gen 1,2,3,4,5,6,7
Android
Android 6.0 aboveAndroid Phones
Android 6.0 aboveAndroid Tablet Brands
SamsungLenovo
Fire
and other devices that support Google Play.
Compatible Device
SPOTTY MIRROR is designed for tablets only
*You will need a tablet with a camera lens located on the longer horizontal edge.
RAM Capacity: 3GB or above
Tablet Size: Min 10 to Max 12 inches
iOS 13 or above
Android 6.0 or above
 Setting up SPOTTY CAMERA
Fully charge SPOTTY

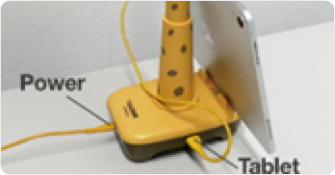
Fully charge SPOTTY until the power button light turns green before use. Use the yellow USB-C cable
included in the box.
A quick charging cable cannot be used to charge SPOTTY.
Remove the protection film

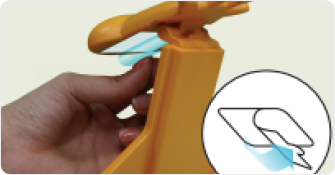
Remove the protection film from SPOTTY’S camera lens.
Place the device

Place the device on the SPOTTY and secure it with the black bowtie.
Connect the tablet to SPOTTY

Connect the tablet to the SPOTTY using the other yellow cable.
Only USB-C type cable is included in the box. If a USB-8pin cable is needed, you must provide it separately.
Press the power button

Press the power button for 3 seconds to turn on SPOTTY and wait until the light turns white. You can check the color of the LED status indicator.
 Setting up SPOTTY MIRROR
Peel off protection film

Peel off SPOTTY’s protection film from mirror underneath SPOTTY face.
Gently wipe the surface of the mirror if SPOTTY cannot detect markers well.
Spread SPOTTY’s legs

Spread SPOTTY’s legs and let it stand alone.
Open the bar from SPOTTY’s body

Pull out SPOTTY’s neck

Pull out SPOTTY’s neck and place the device on the bar.
Move SPOTTY’s face

Move SPOTTY’s face towards the camera lens of the device.
Adjust the angle of the mirror

Adjust the angle of the mirror by moving SPOTTY’s face until you hear the soft clicking sound.
 Setting up ARpedia app
Download the app

Simply search “ARpedia” and download the app from App Store or Google Play.
Open the app

Place the tablet on the SPOTTY and open the app.
Tab OK to access ARpedia

If you choose CANCEL or ignore it, you should allow it in your device setting.
Select country

Select your country and tab next
Select your SPOTTY type

Select Your SPOTTY type as CAMERA. The type of SPOTTY can be changed in the profile.
Type in your email address

Enter an email address where you can access and check the inbox right away.
Open your email inbox and click on ”Verify My Email”

Open your inbox and email from ARpedia and click on Verify My Email.
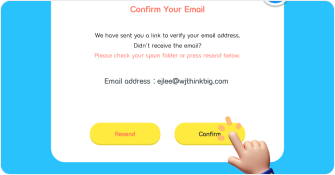
Tab Confirm

Go back to your tablet and tab Confirm.
**One email can be registered on up to two devices and can be changed up to 5 times. For further changes, please contact us through our website or at arpedia@wjthinkbig.com
 Changing SPOTTY Type
Go Menu > Profile


Tab Edit


Select SPOTTY type


Tab Save and Exit


 Starting ARpedia with books
Check the screen of your tablet

Check if the message 'Place the cover of the book you want to read on the screen' appears on the screen.
To switch to a different book, simply go to [MENU > PLAY ANOTHER BOOK]
**One email can be registered with only one QR code. For further changes, please contact us through our website or at arpedia@wjthinkbig.com
Scan QR code on the book cover

Detach markers of the book you want to read,
while waiting for the screen to load.
 Wi-Fi
Wi-Fi

ARpedia requires a stable WiFi connection to download AR resources. Once resources are downloaded, they can be checked in [MENU > Management]. You can also use ARpedia without a Wi-Fi connection afterward. You can verify the downloaded resources as shown below.
 Checking Marker Guide

While the book is loading, ensure you have prepared all the necessary markers. Markers can be stored in the marker holder at the back of the book and you can also check which markers you need for this book as shown in the image.
 Printing markers

When the marker guide appears on the screen, place the marker in the correct position. Do not cover the marker with your hand or fingers. Slightly lifting or moving the marker can also help. If you lose a marker, you can download and print it from the website, [Series > Learn More].


 Setting up SPOTTY
 Setting up SPOTTY
 Changing SPOTTY Type
 Setting up
 Wi-Fi
Wi-Fi